Getting Started
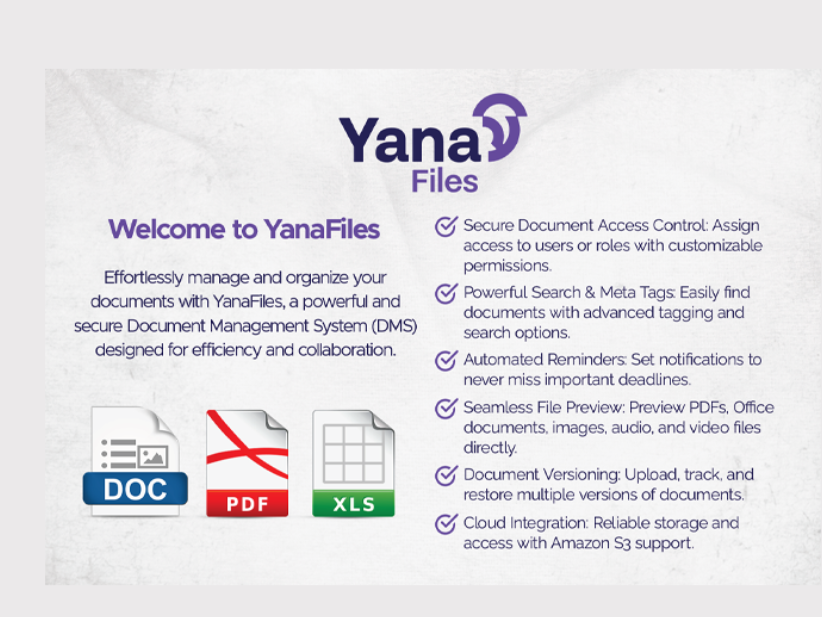
Yana Files is a robust file management system designed to help users store, organize, and manage their files efficiently. Whether you’re an individual looking to organize personal files or an organization managing critical documents, Yana Files simplifies the process while ensuring security and ease of access.
Accessing Yana Files
- Open your preferred web browser.
- Enter the URL provided by your system administrator or IT support.
- Log in using your username and password.
Introduction
Yana Files provides a centralized platform for managing documents and files. With features like file uploading, folder creation, sharing, and version control, Yana Files is tailored to meet diverse file management needs. The system ensures:
- Secure Storage: Files are encrypted and backed up to prevent data loss.
- Easy Retrieval: Intuitive search and tagging features to quickly locate files.
- Collaboration: Share files with team members while controlling access levels.
Login
To access Yana Files, follow these steps:
- Navigate to the Login Page: Open your browser and go to the Yana Files URL.
- Enter Your Credentials:
- Username: Enter your registered username or email address.
- Password: Enter your secure password.
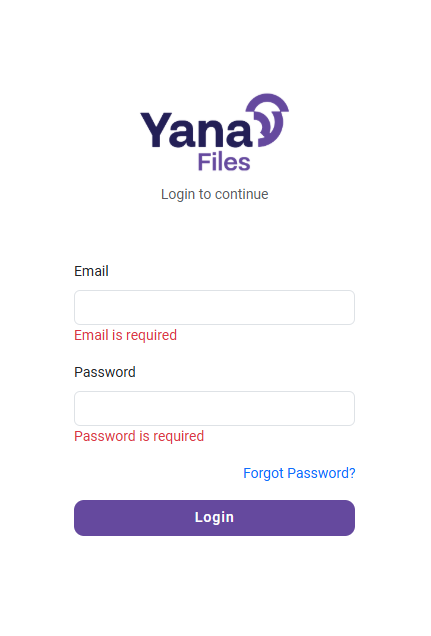
- Click Login: Press the Login button to access your account.
- Forgot Password: If you’ve forgotten your password, click on the Forgot Password link and follow the prompts to reset it.
Security Tips
- Do not share your password with others.
- Ensure you log out after using Yana Files, especially on shared devices.
Dashboard
Once logged in, you’ll be directed to the Yana Files Dashboard. This is your central hub for managing files and folders.
Dashboard Overview
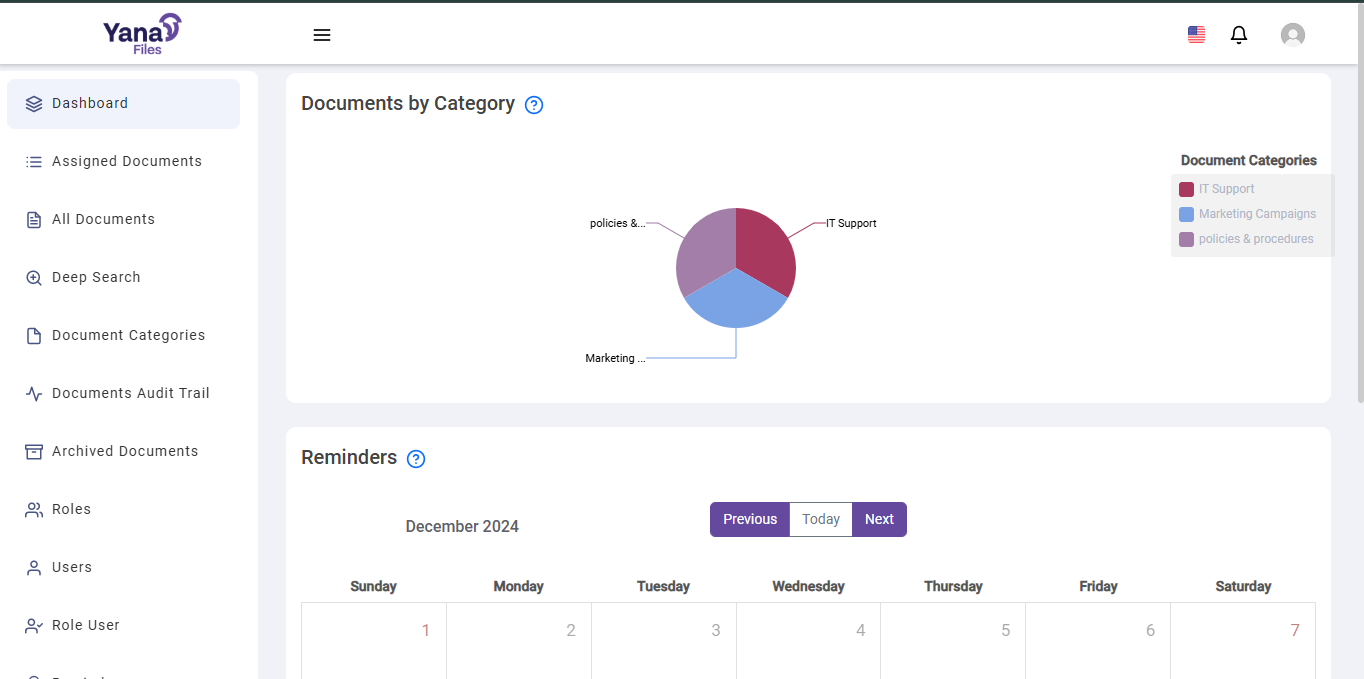
- Navigation Menu: Includes options such as:
- Dashboard: Overview of your activity.
- Assigned Documents: View documents assigned to you.
- All Documents: Access all files and folders.
- Deep Search: Perform advanced searches.
- Document Categories: Group and organize files by categories.
- Documents Audit Trail: Track file modifications and access history.
- Archived Documents: Manage older or infrequently used files.
- Roles: Manage user roles.
- Users: View and edit user details.
- Reminders: Set and view scheduled tasks or reminders.
- Documents by Category: Visualized as a pie chart on the main dashboard on how the documents has been categorized .
- Reminders Section: Calendar view showing upcoming tasks or reminders on activities has to be performed.
- Notifications: Alerts for shared documents or system updates.
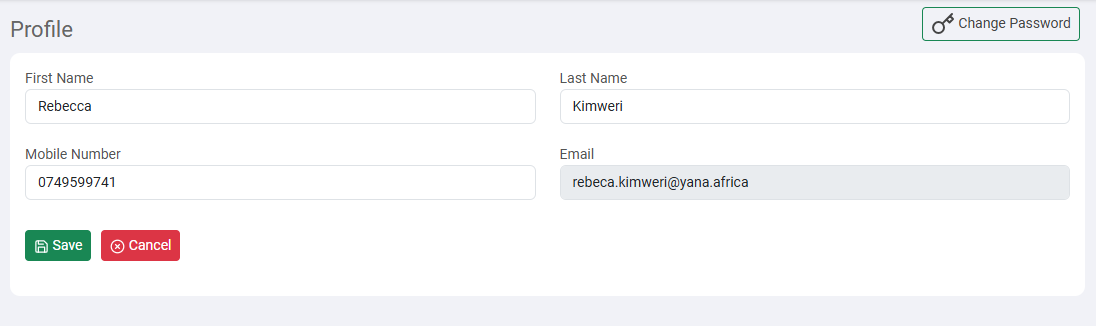
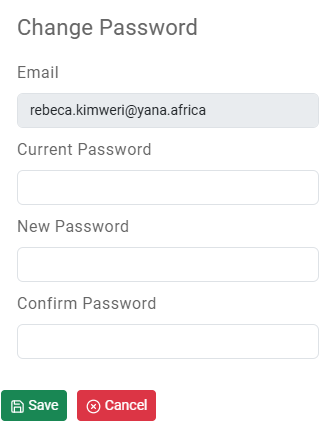
- Profile & Password:
- Profile:short article giving a description of user's information.
- Password:Here you can update password for adding security.
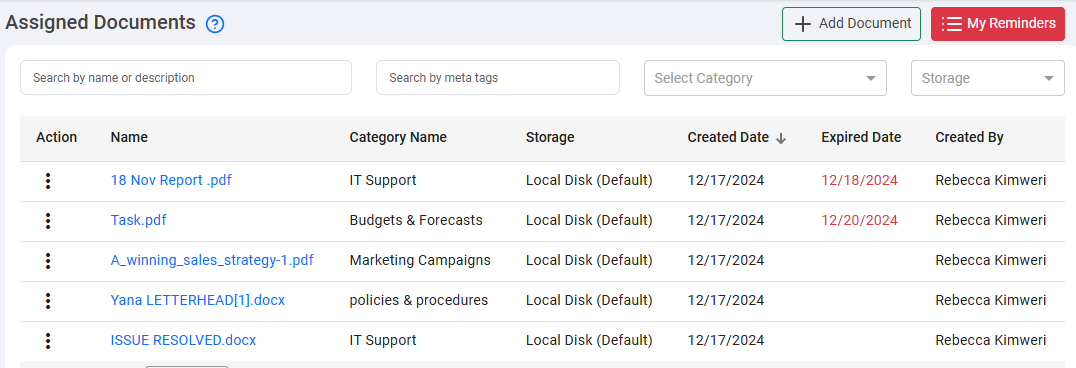
Assigned Documents
The Assigned Documents page is the central hub for managing documents allocated to a specific user. Here, users can view all the documents assigned to them, search for specific documents, and perform various actions on each document.
Main Components:
- Add Document Button: Allows users to upload a new document to the system.
- My Reminders: Displays a list of all the reminders set by the user.
- Search Box (by name or document): Allows users to search for a specific document.
- Search Box (by meta tags): Users can enter meta tags to filter and search for specific documents.
- Category Selection Dropdown: Filters documents based on their Category.
- Status Selection Dropdown: Filters documents based on their status.
- List of Files: Displays the documents assigned to the user in allocation order.
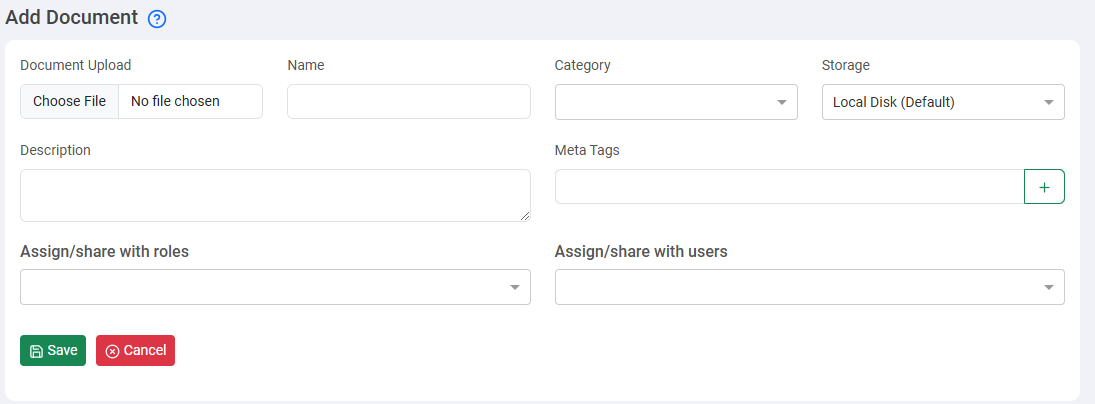
How to Add a New Document:
- Click the "Add Document" button.
- Select and upload the desired file.
- Fill in the necessary details and click "Save" .
Document Actions:
- Edit, Share, View, Upload a Version, Version History, Comment, Add Reminder
All Documents
The all Documents page provides a complete overview of all documents uploaded. It is the ideal place to search, view, manage, and distribute all available documents in the system.
Main Components:
- Add Document Button: Allows users to upload a new document.
- Search Boxes: Search by name, meta tags, or creation date.
- List of All Uploaded Files: Displays all documents available in the system.
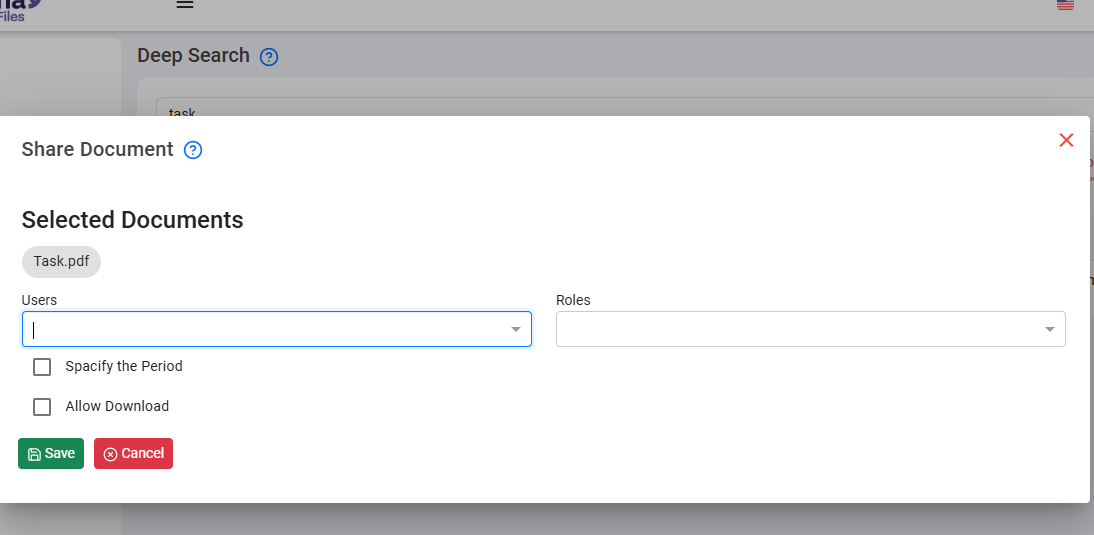
- Document Actions Menu: Edit, Share, Get Shareable Link, View, Upload a New Version, Version History, Comment, Add Reminder, Send as Email, Delete.
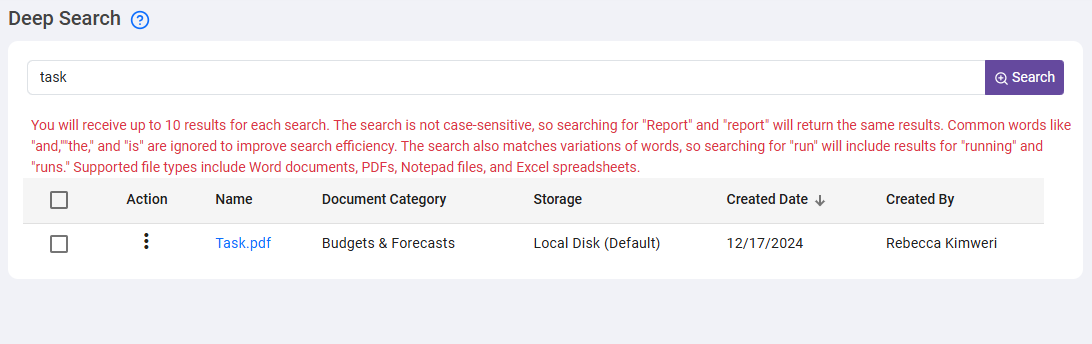
Deep Search
The Deep Search feature in the document management system enables users to perform powerful searches within the content of various file formats such as PDFs, Word documents, text files, and Excel spreadsheets.
Key Features:
- Content-Based Search: Scan content inside documents for keywords, phrases, or data.
- Share:You can share seamlessly across different file formats.
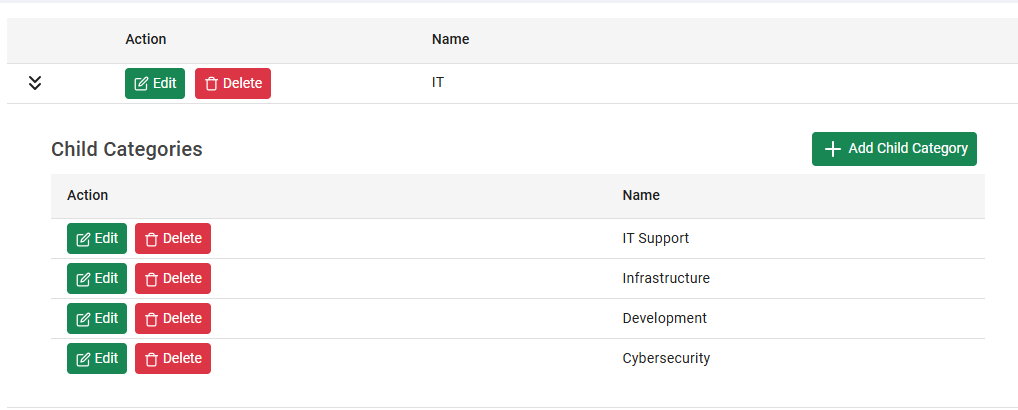
Document Categories
The Document Categories page serves as a centralized hub for managing and organizing Categories, which essentially represent the departments that work with the files.
Features:
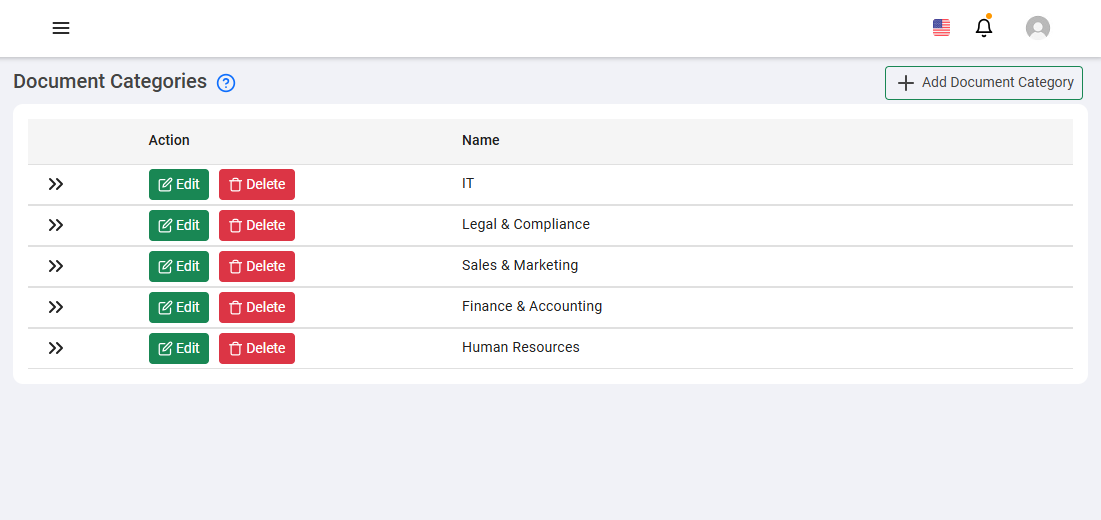
- Add New Document Category: Create a new Category or department.
- List of Existing Categories: Displays all created Categories and associated action options.
- Action Menu: Edit or delete Categories, view and manage subcategories.
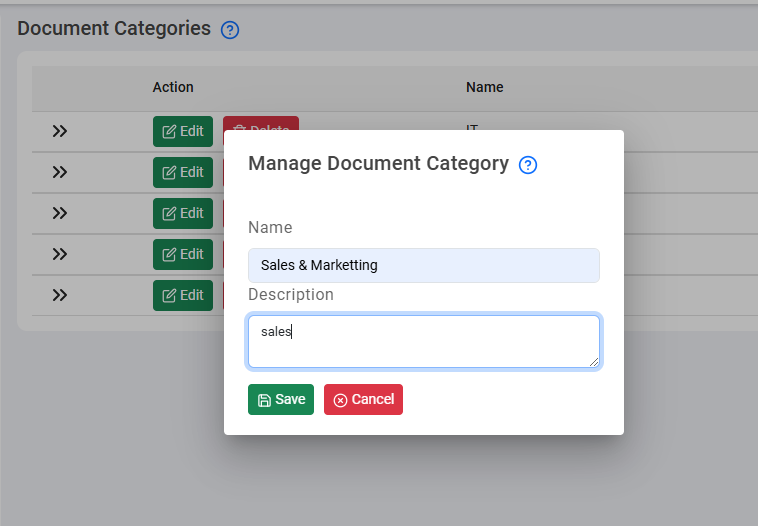
How to Add a New Category:
- Click on the add New Document Category button.
- Enter the Category name and description.
- Click "Save".
How to View Subcategories:
- Locate the main Category in the list.
- The associated subcategories will be displayed beneath the main Category.
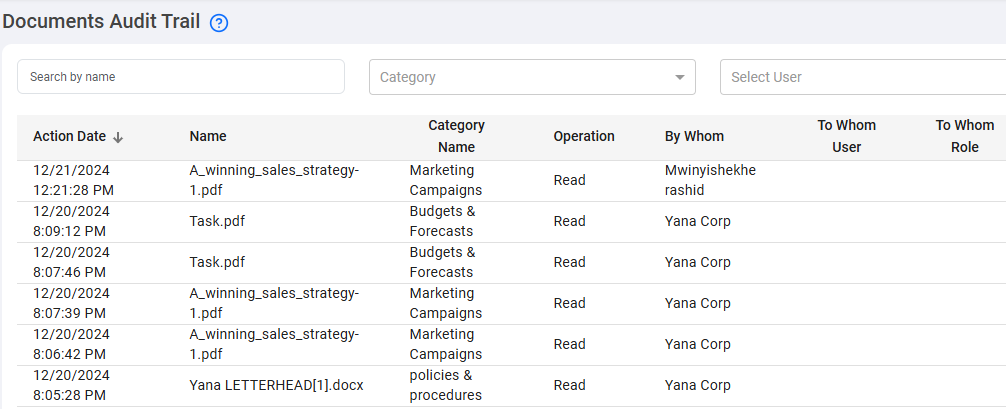
Document Audit History
The Document Audit History page provides a detailed view of all actions performed on documents. It allows administrators and users with appropriate permissions to monitor and review document-related activities, ensuring transparency and information security.
Main Components:
- Search Boxes
- By Document Name: Allows users to search for a specific document by entering its name or other details.
- By Meta Tag: Users can enter meta tags to filter and search for specific document-related activities.
- By User: Enables filtering activities based on the user who performed the operation.

- List of Audited Documents: Displays all actions taken on documents in a tabular format. Each entry includes details such as date, document name, Category, operation performed, who performed the operation, to which user, and to which role the operation was directed.
- List Sorting: Users can sort the list by any available column.
How to Sort the List
- Click on the column title by which you want to sort the list.
- The list will automatically reorder based on the selected criterion.
Archived Documents
Archived Documents page feature allows users to securely store and organize documents that are no longer actively used but need to be retained for future reference or compliance purposes. Archiving helps declutter the active workspace by moving older documents to a dedicated archive while still keeping them easily accessible when needed.

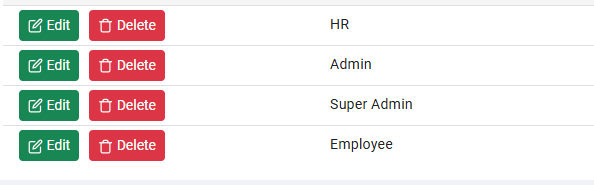
Roles
The User Roles page is essential for managing and defining permissions within the CMR DMS. Roles represent predefined sets of permissions that can be assigned to users, ensuring that each user has access only to the functionalities and documents appropriate to their position and responsibilities within the organization.
Main Components:
- Add Roles Button: Allows administrators or users with appropriate permissions to create a new role in the system.
- List of Existing Roles: Displays all roles created within the system in a tabular format.
- Action Menu for Each Role:
- Edit: Modify the role's details and permissions.
- Delete: Removes the role from the system.
- Role Creation Page: Administrators can define specific permissions for each role.

How to Add a New Role:
- Click on the "Add Roles" button.
- Enter the role name and select the appropriate permissions.
- Click "Save" or "Add" to create the role.

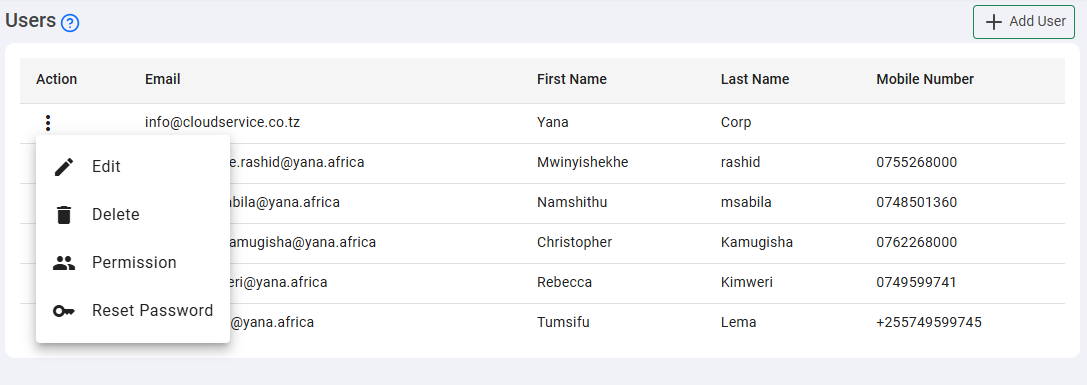
Users
The users page is the central hub for managing all registered users. Here, administrators can add, edit, or delete users, as well as manage permissions and reset passwords.
Main Components:
- Add User Button: Allows administrators to create a new user in the system.
- List of Existing Users: Displays all registered users in a tabular format.
- Action Menu for Each User:
- Edit: Modify the user's details.
- Delete: Remove the user from the system.
- Permissions: Set or modify the user's permissions.
- Reset Password: Initiate a password reset process.

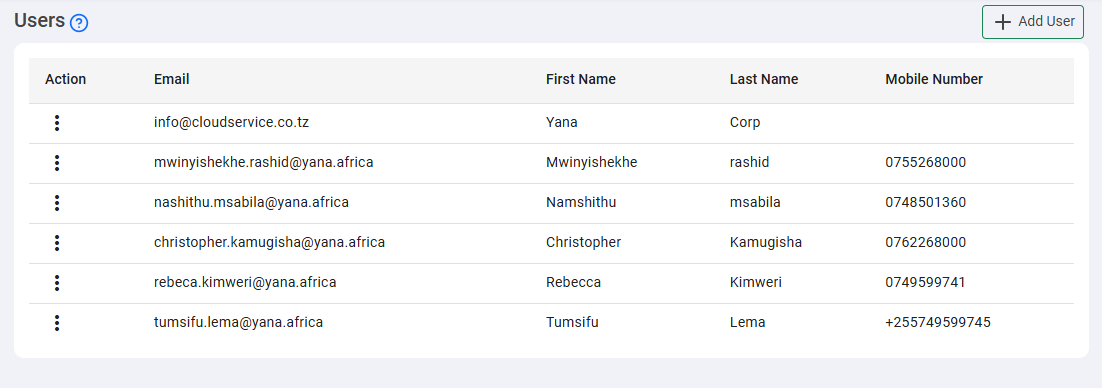
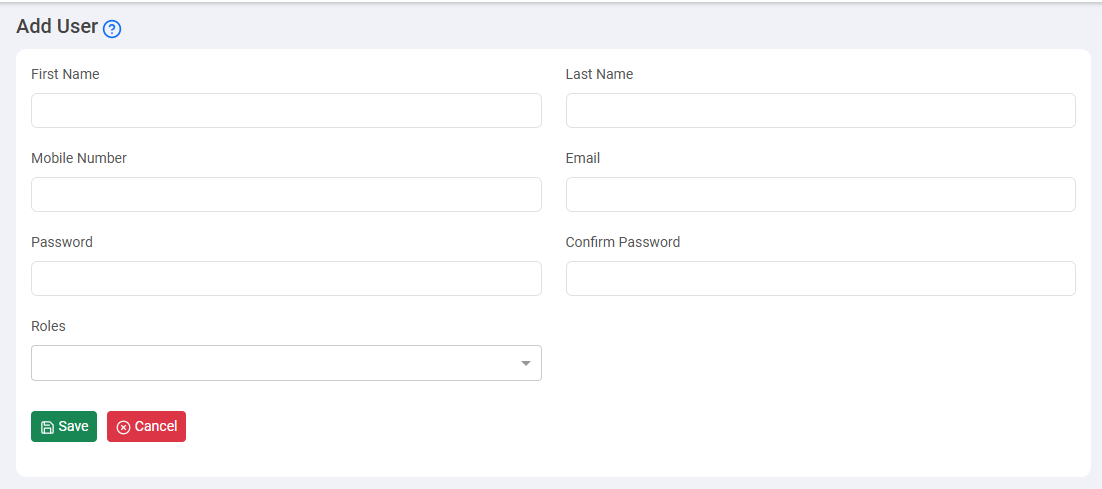
How to Add a New User:
- Click on the Add User button.
- Enter the user's details and confirm the password.
- Click Save to add the user to the system.
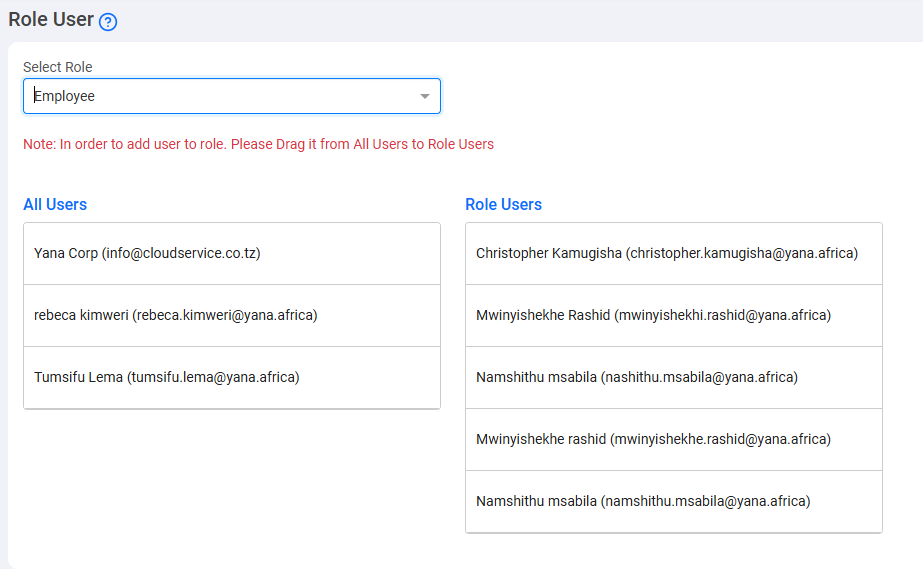
Role user
The User with Role page is dedicated to assigning specific roles to users. It allows administrators to associate users with particular roles using an intuitive "drag and drop" system.
Main Components:
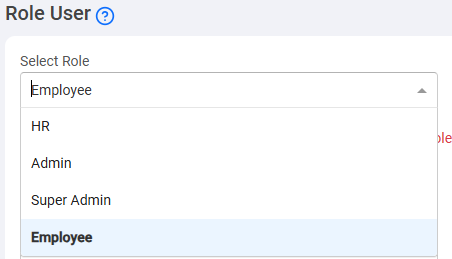
- Select Role: A dropdown menu for choosing the role to assign to users.
- All Users and Users with Role Lists:
- All Users: Displays a complete list of all registered users.
- Users with Role: Displays users assigned to the selected role.
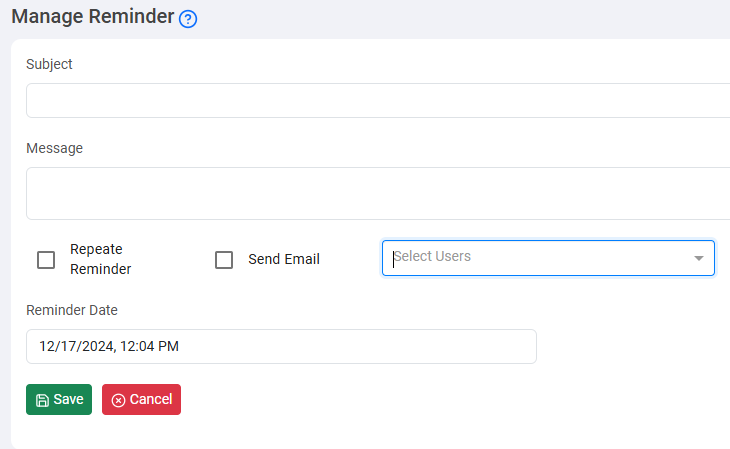
Reminders
The Reminders page is the central hub for managing reminders w, where users can create, view, and manage reminders or notifications related to documents or other activities. Reminders can be set to repeat at regular intervals and can be associated with a specific document for efficient tracking of tasks and activities.
Main Components:
- Add Reminder Button: Allows users to create a new reminder.
- Reminders Table: Displays all created reminders in a tabular format. Each entry includes details such as start date, end date, reminder subject, associated message, recurrence frequency, and associated documents.
Add Reminder Form:
- Subject: The title or topic of the reminder.
- Message: Additional details about the reminder.
- Repeat Reminder: Sets the recurrence frequency (daily, weekly, etc.).
- Send Email: Option to send an email notification when the reminder is activated.
- Select Users: Allows selecting users to whom the reminder will be sent.
- Reminder Date: The date and time when the reminder will be activated and sent.
How to Add a New Reminder:
- Navigate to the Reminders page.
- Click the "Add Reminder" button.
- Fill in the form fields with the necessary information.
- Click Save to save the reminder in the system.

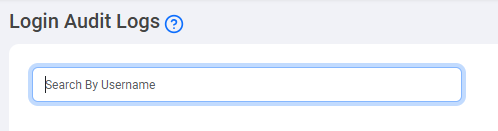
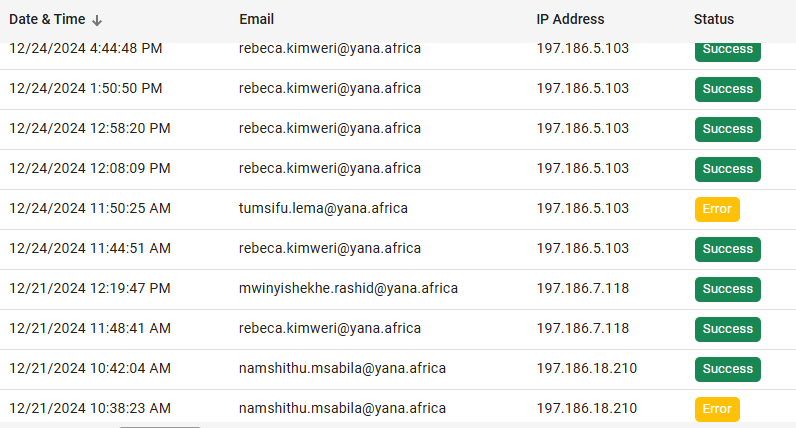
Login Audit Logs
The Login Audit Logs page serves as a centralized record for all authentication activities within system. Here, administrators can monitor and review all login attempts, successful or failed, made by users. This provides a clear perspective on system security and user activities.
How to View Log Entries:
- Navigate to the Login Audit Logs page.
- Browse through the table to view all login entries.
- Use the search or filter function, if available, to find specific entries.
Main Components:
- Authentication Logs Table: Displays all login entries in a tabular format. Each entry includes details such as username, login date and time, IP address, and the result (success/failure).
Setting
Settings section of Yana Files allows users to personalize and configure system preferences to meet their specific needs
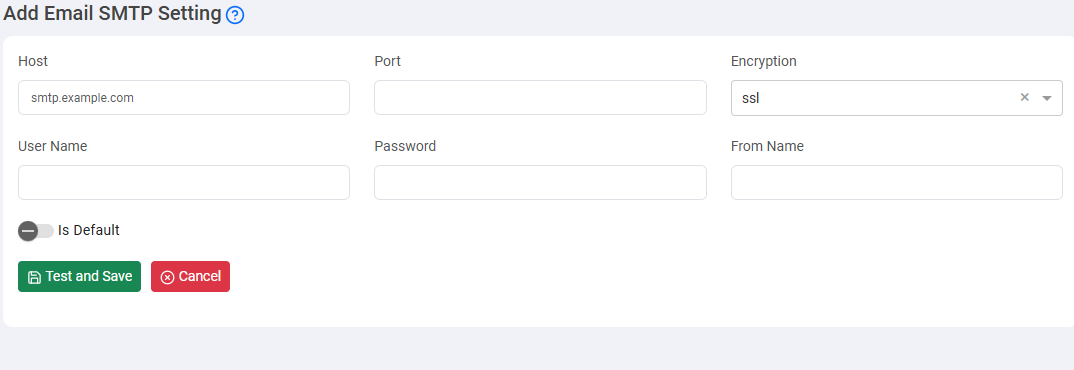
Email SMTP Settings
Email SMTP Settings allows administrators to configure SMTP settings for sending emails, ensuring efficient delivery.
Key Components
- SMTP Settings Table: Displays all configured SMTP settings such as username, host, port, and default status.
- Add SettingsButton: Opens a form to add new SMTP configuration details.
How to Add a New SMTP Configuration
- Click the Add SMTP Settings button.
- Fill in the form with the necessary details.
- Select the desired options (e.g., set as default).
- Click Save and Test to finalize the configuration.

Add Settings Form Details
- Username: The authentication username for the SMTP server.
- Host: The SMTP server address.
- Port: The port on which the SMTP server listens.
- Is Default: Checkbox to set this as the default configuration.
Company Profile Configuration
The Company Profile feature allows users to customize the branding of the application by entering the company name and uploading logos.
Company Name
- Input Field: Users can enter the company name in a text input field.
- Validation: Ensures the name is not empty and follows the specified length requirements (e.g., min 2, max 50 characters).
- Browser Title Setting: The company name updates the browser title for improved brand visibility.
Logo Upload
- Upload Button: Allows users to upload a company logo for the login page header.
- File Requirements: Supported formats: PNG, JPG, JPEG (max size: 2 MB). Recommended dimensions: 200px (width) x 100px (height).
- Preview: Displays a preview after uploading to confirm the logo.
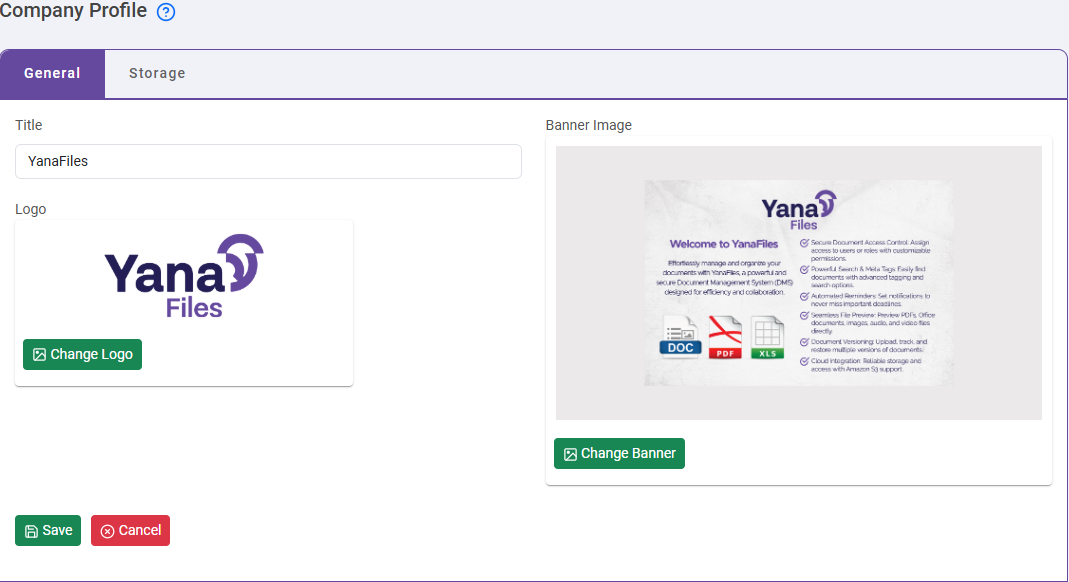
Banner Logo Upload
- Upload Button: Allows users to upload a banner logo for display on the login screen.
- File Requirements: Supported formats: PNG, JPG, JPEG (max size: 3 MB). Recommended dimensions: 1200px (width) x 300px (height).
- Preview: Displays a preview of the banner logo after uploading.
User Interaction Flow
- Accessing Company Profile: Access through the settings or administration panel.
- Editing Company Profile: Users can enter the company name and upload logos.
- Saving Changes: Click Save to apply updates, with confirmation messages displayed.